Putting Drills to Improve Your Scores
The 2 Ball Drill
Out of the hundreds of putting drills that are around today, this two-ball putting drill will help you control speed and acquire feel for that speed. It is also a great drill to help you adjust to the varying green speeds. Many people have problems when the greens are fast at one course then slow at another.
To start out with this drill you will need 2 balls that are the exact same. For example, 2 ProV1's, 2 Bridgestone 330RX, 2 Top Flight Gamers, etc. The point is make sure they are the same because if you have two different balls, this drill will be ineffective.
Getting Started
- Take one ball and hit it out to open space on the green about 5-10 feet; the distance does not need to be exact
- Then take the second ball and attempt to make the exact same copy of the previous stroke. If you get the second ball within 6 inches of the first, the you know you did it right
- Once you get 2 balls within 6 inches of each other on consecutive times from 5-10 feet then switch up and start putting to 15-20 feet a couple of times doing the same thing.
Developing feel with the 2 ball drill
- While you are hitting these putts out to certain distances it is important to note that you should be paying attention to the stroke you are using to deliver the ball that certain distance
- If you use a medium stroke that delivers the ball out to 10 feet on a flat section of the practice green you know right then that for any putts on the course that day from 10 feet that is flat you would use your medium stroke
- The same would go for a 15 foot putt on the practice green, once you get a feel for what your 15 foot stroke is you then know for flat 15 foot putts on the course you would use your 15 foot stroke
- Start out hitting 2 balls out 5-10ft not at holes
- Once you feel comfortable start hitting putts to 15-20 feet
- After you have developed feel, constantly switch up distance putts of 5-10-15-20 and even 25-30 feet going to a hole, your main goal here is focusing on speed
- After you hit several putts from different distance then its best to go out to 10 feet from a hole and work your way around in a circle pattern so you can cover the different breaks
Tick Tock Drill
This drill is excellent for the timing of the stroke. The goal of this drill is to help with reaching peak speed of the putter just before impact and not afterwards. If you reach peak speed after impact it becomes nearly impossible to create feel and have good speed.
To start
- Setup like you would to hit a regular putt out to 10 feet or so
- As you make the stroke, the time it takes from address to top of stroke should be the word "tick"
- On the way down from the top of back stroke to impact should be "tock"
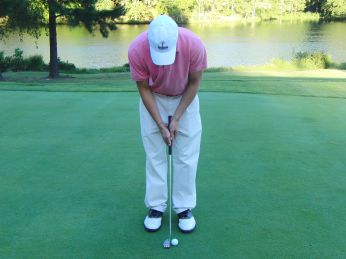 |
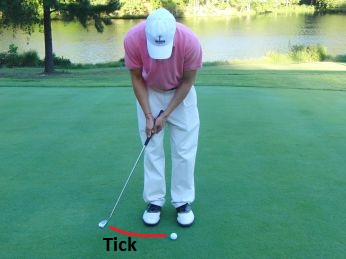
|
Putting Setup |
Tick to Top of Stroke |
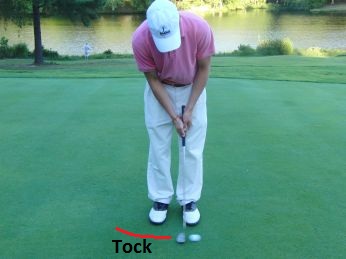
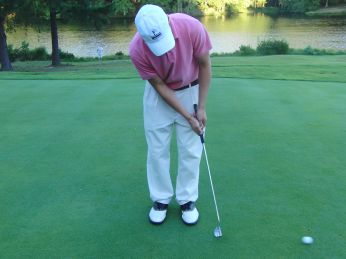
| 
|
Tock to Impact |
Putting Finish |
To be sure you fully understand this concept, make sure you say "tick" as you take the putter back, then say "tock" as you bring the putter back down, before impact.
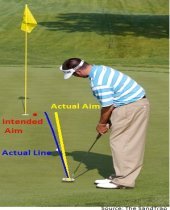
Starting Putts on Line
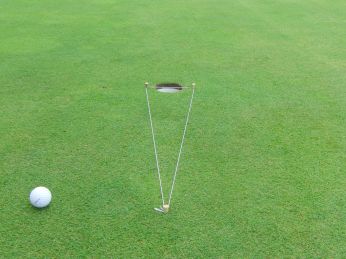
For this putting drill, courtesy of David Orr, you will need some string and 3 tees.
Setting up
- Find a straight putt to a hole
- Take 2 tees and put them in the ground on the edges of the cup
- Put the other tee in the ground about 2-3 feet away to make a triangle
- Then take the string and wrap it around the tees
- After you have this setup, start hitting a few putts with the ball starting at the bottom tip of the triangle
- As you hit the putts, focus on launching the putts inside the triangle
Controlling the Wrists
One of the biggest problems I see these days with golfers is that they are too wristy when they putt. When I see someone who is too wristy, they will usually struggle with feel.
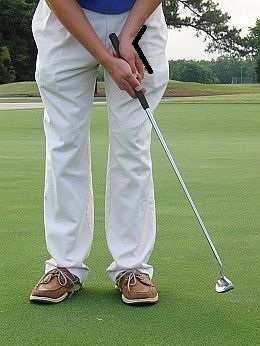
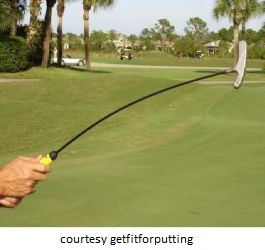
To fix this you should check out the rhythmiser by Harold Swash. It is one of the best putting aids I have seen that helps with controlling the timing of the stroke and fixing the golfer's wrists as a putting drill.
Using the Rhythmiser
- The goal with this training aid is to be able to go the entire stroke without the shaft bending
- With the shaft being very flexible it will be quick to show the fault of moving the putter too quickly from top of back stroke
- It will also show the fault by the bending the shaft from starting the putter too quickly from address
Getting Consistent with Impact
For this putting drill take 2 rubber bands and wrap them on the outside of the impact zone. This zone is usually located very close to center of putter face or just a little inside toward the hosel.
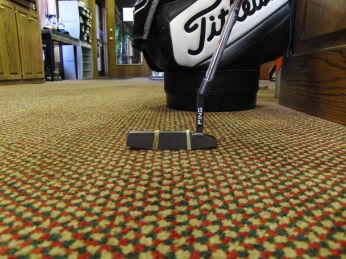
Once you have the 2 rubberbands set on the edges of the impact zone, try hitting a few putts and checking to see if you are consistently hitting the impact spot between the rubberbands.
Another great way that David Orr has found to check impact spots on the putter face is by using chapstick.
Ways of Measuring Impact Spots
- According to SamPuttLab the ideal impact spot should be at top center of putter face
- If you have impact from the top to bottom on the face it could mean you are shortening the putter through impact too quickly your left elbow
- Another impact spot on bottom of face could be the shaft leaning back too much going through impact
- The other impact spot of top to bottom can be due to the shaft leaning forward
By checking your impact spot regularly you will get a good grasp on what your tendencies are and will become a better putter because of it.
Hopefully using some of these featured putting drills you will be on your way to draining putts.
Return From Putting Drills to Putting Tips
Return from Putting Drills to Bo Knows Golf Tips
Follow Us on Facebook and Twitter
We appreciate anything you can contribute to this website. We appreciate your support as we do not take your donations lightly as it helps keep our website current and fresh with information. To donate please use the button below. If you give $20 or more we will send you our free E-Book "The Major Swing Philosophies of Golf" by Bo Watson
Subscribe to our Monthly Newsletter!
 Can't find what you're looking for? Ask me over at Golf Questions and Answers Page.
 Find out why a correctly fit putter is crucial to the success of your Putting Line.
Testimonials:
Bo, I wanted to thank you for your help so far with my golf game. I wanted to let you know that I shot a 75 the other day in a tournament round, my best round ever. I had 32 total putts and NO 3 putts. I definitely couldn't have done that before. Thanks again and I'll be back in touch soon to get some more lessons lined up.
Brett
Bo I just wanted to tell you about another tournament I played in. I went out and played and shot a 75 which is one of my best rounds this year so I think everything is coming together. I've been making alot of birdies lately and just wanted to thank you for everything!
Adam Mikhalko
Hey Bo when I got back from camp I played really well I’m putting great and I’m hitting the ball well. Thank you for everything at camp.
Alvaro
Hey Bo!!! I have been playing my best in golf, mostly because of you!!! two days ago I shot an 80 in my club tourney and came in 3rd place.
Brandtley Taylor
I played in a tournament when I got back from camp and shot 76 and came in fourth. I feel much more confident on the course with my mental thoughts. I used the tips you wrote down on that sheet and they have helped me alot.
Freddy Weber


